

How to Design a Flyer Fast: Resources with Thousands of Templates for Any Skill Level
Whether you are promoting a weekend event, advertising a sale, or spreading the word about a community gathering, creating a flyer should not take hours of your time or require a background in graphic design. The good news is that today’s online design resources have made professional-quality flyers accessible to virtually everyone, and many of them give you access to thousands of ready-to-use templates right out of the gate. If you have ever stared at a blank screen unsure where to start, this guide is for you.
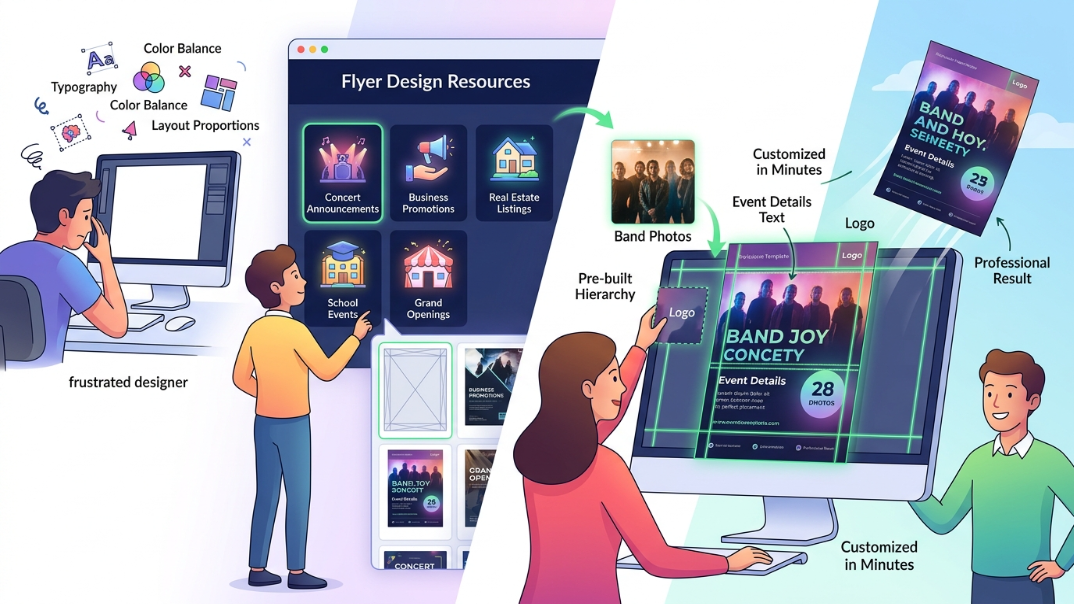
Why Templates Change Everything
Starting from a blank canvas is one of the fastest ways to get stuck. Professional designers spend years developing an eye for typography, color balance, and layout proportions. Templates compress all of that expertise into a starting point you can customize in minutes.
The best flyer design resources organize their templates by purpose, so you are not wading through hundreds of irrelevant options. You can find templates built specifically for concert announcements, business promotions, real estate listings, school events, grand openings, and more. That specificity saves you from having to think about structure at all because the visual hierarchy is already built in. All you have to do is swap in your own text, photos, and branding.
For people without a design background, templates also offer a guardrail. They make it harder to accidentally create something that looks unprofessional, because the spacing, font pairings, and color relationships have already been tested by professional designers.
What to Look for in a Flyer Design Resource
Not all design tools are created equal, and when speed and ease are priorities, a few qualities matter more than others.
A large template library organized by category. A resource with thousands of templates is only useful if you can find what you need quickly. Look for tools that let you filter by event type, industry, color palette, or visual style. The faster you can land on a starting point, the faster you can finish your flyer.
Drag-and-drop editing. If you have to learn a complex interface before you can customize anything, you will lose time. The most effective tools for non-designers use simple drag-and-drop mechanics so you can move, resize, and replace elements without any instruction.
Access to free images and graphics. Many flyers need more than just text. A good resource includes a built-in library of stock photos, icons, and graphic elements so you are not hunting across multiple sites to pull a design together.
Multiple download and sharing formats. You may need a print-ready PDF for a local shop and a JPEG or PNG for sharing digitally. The best resources let you choose your format based on how and where you plan to use the flyer.
Brand consistency tools. If you are creating flyers for a business or organization, look for tools that let you save brand colors, fonts, and logos. Applying them consistently across designs becomes much faster when you are not starting from scratch each time.
10 Tips for Designing a Flyer Quickly and Confidently
1. Start with a template, not a blank page
This cannot be said enough: your starting point matters. Choosing a template that is already close to what you need cuts your design time dramatically. Sort by your flyer’s purpose and pick the layout that matches your content most closely. You are not locked into anything, but having a solid foundation means you spend your time refining rather than building from scratch.
2. Lead with one clear message
Before you open any design tool, write down the single most important thing your flyer needs to communicate. Is it a date? A sale amount? A call to action? Every visual decision should support that message. Flyers that try to say everything end up communicating nothing. Keep your headline short, bold, and readable from a distance.
3. Limit yourself to two or three fonts
One of the most common mistakes non-designers make is using too many different fonts. Most professional templates use one font for headlines and one for body text, sometimes with a third for accent details. When you are customizing a template, resist the urge to swap out every font. Stick with what the template already uses or choose one pairing that works together.
4. Use contrast to guide the eye
Your flyer needs a visual hierarchy that tells the reader what to look at first, second, and third. High contrast between your headline and the background creates immediate focus. If your background is dark, use light text. If it is light, use dark text. Avoid combinations like light gray text on white, which becomes hard to read in both print and digital formats.
5. Replace placeholder images with your own
Stock photos in templates are there to show you what is possible, but replacing them with real images of your business, event, or product makes your flyer significantly more engaging and credible. Most tools let you upload images directly from your device and drop them into the existing layout without any resizing work.
6. Use the AI generation features to skip the browsing stage
Many modern design resources now include AI-powered flyer generators. Instead of scrolling through templates manually, you type a short description of what you need and the tool generates a set of relevant starting points automatically. Describing your flyer in plain language, such as “summer community festival with a bright and energetic feel,” produces results that are much more targeted than browsing a general library. If you want to see this in action, you can create a flyer using Adobe Express’s free online tool, which includes an AI generator alongside thousands of categorized templates. The process involves typing a prompt, selecting a result, and customizing it directly in the browser with no prior design experience required.
7. Keep your color palette tight
Most templates come with a preset color scheme for a reason. Sticking to three colors or fewer creates a cleaner, more professional result. If you need to adjust colors to match your brand or event theme, change them systematically rather than applying different colors to every element. Many design tools have a color palette feature that lets you update all instances of a color with a single click.
8. Add a clear call to action
Every effective flyer ends with a direction for the reader to follow. Whether it is a website URL, a phone number, a QR code, or a specific instruction like “Reserve your spot by Friday,” the call to action needs to stand out visually and be easy to find at a glance. Place it somewhere prominent, give it its own space on the page, and make sure the font size is large enough to read without straining.
9. Proofread before downloading
It sounds obvious, but in the rush of designing, typos and formatting errors are easy to miss. Before you download or share your flyer, read every line of text carefully. Check names, dates, times, phone numbers, and URLs. Errors on a printed flyer are expensive to fix. Errors on a digital flyer that has already been shared are even harder to correct.
10. Choose your file format based on your distribution plan
If your flyer is going to print, download it as a PDF. Print shops prefer PDFs because they preserve fonts, resolution, and color accuracy. If you are sharing your flyer digitally via email, social media, or a website, a JPEG or PNG is typically the right choice. Some tools also allow you to animate elements and export as a video file, which works well for social media formats that favor motion.
How to Build a Print-Ready Flyer in Under 15 Minutes
Here is a practical walkthrough of the process using a free online tool, broken into simple steps that require no design background.
Open your browser and go to create a flyer with Adobe Express. You do not need to install anything. If you do not have an account, creating one is free and takes under a minute.
Once you are in the editor, use the search bar to describe your flyer type. For example, type “business grand opening” or “community fundraiser.” Browse the template results and click on one that matches the tone and layout you have in mind. The template opens directly in the editor.
On the left side panel, you will see options for templates, text, elements, images, and brand assets. Click on the text fields in your flyer and replace the placeholder copy with your own information. Adjust font size if needed using the top toolbar.
To swap out the background image or any placeholder photo, click on the image in the template and use the “Replace” option to upload your own photo or search the built-in stock library for something that fits. Drag it into place and resize as needed.
Once your content is in place, review the flyer for any spacing issues or text that looks crowded. Use the alignment and spacing tools in the top toolbar to make adjustments. When you are satisfied, click the Download button and choose your preferred format. For print, select PDF. For digital sharing, select JPG or PNG.
That is the entire process. From template selection to finished file, most basic flyers take less than 15 minutes with this workflow.
FAQ: Fast Flyer Design for People Without Design Experience
Do I need any design skills to use template-based flyer tools?
No design skills are required. Template-based tools are built specifically to remove the barriers that come with traditional design software. Everything is pre-arranged and pre-styled for you. Your job is simply to replace the placeholder content with your own. The drag-and-drop interfaces that most of these tools use are intentionally intuitive, meaning you can rearrange elements, adjust colors, and upload photos without any instruction. Even people who have never designed anything professionally can produce polished results on their first try.
Are free flyer design tools actually free, or are there hidden costs?
Most reputable tools offer a genuinely useful free tier. You typically get access to thousands of templates, a library of free stock images, and basic editing features at no cost. Some advanced features, such as premium templates, brand kits, or the ability to schedule and publish content directly from the platform, may require a paid plan. For the majority of flyer projects, though, the free tier is more than sufficient. It is worth reading the pricing page of any tool you use so you know exactly what is and is not included before you start.
What is the best file format for a flyer I am going to print?
For printing, PDF is almost always the right choice. A PDF preserves the exact layout, fonts, and resolution of your design regardless of what software the print shop uses to open it. JPEGs and PNGs can lose quality when scaled up to print dimensions, particularly if the original file was sized for a screen. When downloading for print, check whether the tool allows you to export at high resolution, typically 300 DPI or higher. If you are ordering prints from an online service, some platforms accept direct uploads from design tools, which simplifies the process considerably.
How do I make sure my flyer looks consistent with my brand?
The key is to use your brand’s specific colors, fonts, and logo in every flyer you create. Many design tools allow you to save a brand kit so that these elements are always available and easy to apply. Before you start customizing a template, upload your logo, note your exact brand color codes (typically in HEX format), and identify the fonts your brand uses. Applying them consistently across all your flyers, social posts, and other materials creates visual recognition over time. If you use your flyer to promote events, pairing your branding with a ticketing platform like Eventbrite can also help create a consistent experience from the flyer all the way through to registration.
Can I design a flyer on my phone, or do I need a computer?
Most modern flyer design tools are fully functional on mobile devices, either through a mobile browser or a dedicated app. The experience is slightly different from working on a desktop, particularly when it comes to fine-tuning spacing and text positioning, but the core functionality is the same. If you need to put together a quick flyer on the go, a mobile-friendly design tool works well. For more detailed or print-ready work, a larger screen gives you more control and makes it easier to see exactly how the finished flyer will look.
The Bottom Line
Designing a professional flyer no longer requires expensive software, a design degree, or hours of your time. With the right resource and a library of thousands of templates at your fingertips, you can go from idea to finished file in minutes. The tools available today are built for real people with real deadlines, not just professionals with design backgrounds.
The most important thing is to pick a tool, start with a template that matches your purpose, and focus on your message rather than the mechanics. Swap in your content, adjust your colors and images, and download in the format you need. Everything else is just practice. The more flyers you make, the faster the process becomes, and the better your eye gets for what works and what does not.